
Overview
The Microsoft 365 DLP (Data Loss Prevention) integration allows autobotAI to connect with Microsoft's built-in compliance and data protection capabilities within the Microsoft 365 ecosystem. Microsoft 365 DLP enables organizations to identify, monitor, and automatically protect sensitive information across Microsoft 365 services including Exchange Online, SharePoint Online, OneDrive for Business, Microsoft Teams, and endpoint devices.
By integrating Microsoft 365 DLP with autobotAI, you can automate incident response workflows for policy violations, retrieve DLP alerts and incidents, trigger remediation actions, and build end-to-end compliance automation pipelines from one platform.
This guide provides instructions for setting up the Microsoft 365 DLP integration in your autobotAI account. By completing this process, you will connect your Microsoft 365 tenant and its DLP capabilities to the platform.
Prerequisites
Before starting, ensure you have:
- A Microsoft 365 tenant with an active subscription that includes DLP capabilities (e.g., Microsoft 365 E3/E5, or Microsoft Purview).
- A Microsoft Entra ID (Azure AD) App Registration with appropriate API permissions.
- The following credentials from your App Registration:
- Tenant ID
- Client ID
- Client Secret
Instructions for creating an App Registration and granting the required permissions can be found in the Additional Information section.
Steps to Set Up Microsoft 365 DLP Integration
Step 1:
Navigate to the Integrations page by selecting Integrations from the menu. Click the + Add Integration button in the top-right corner to view available integrations.

Step 2:
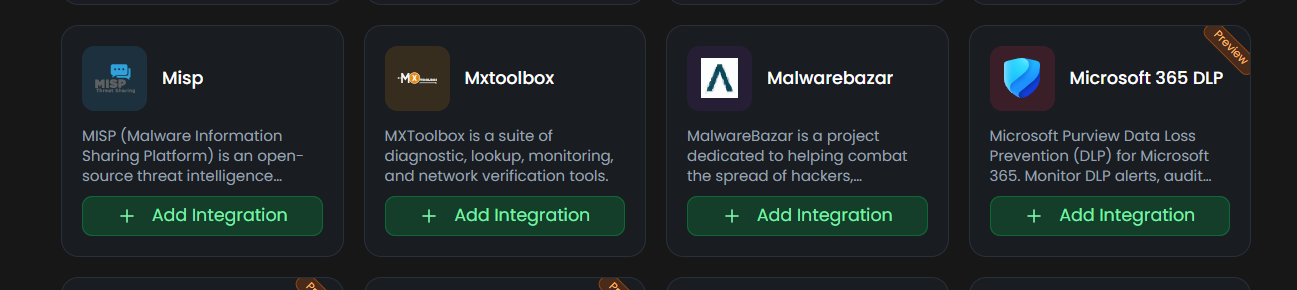
From the list, under the Security Tools section, select Microsoft 365 DLP + Add to initiate the integration setup.
Step 3:
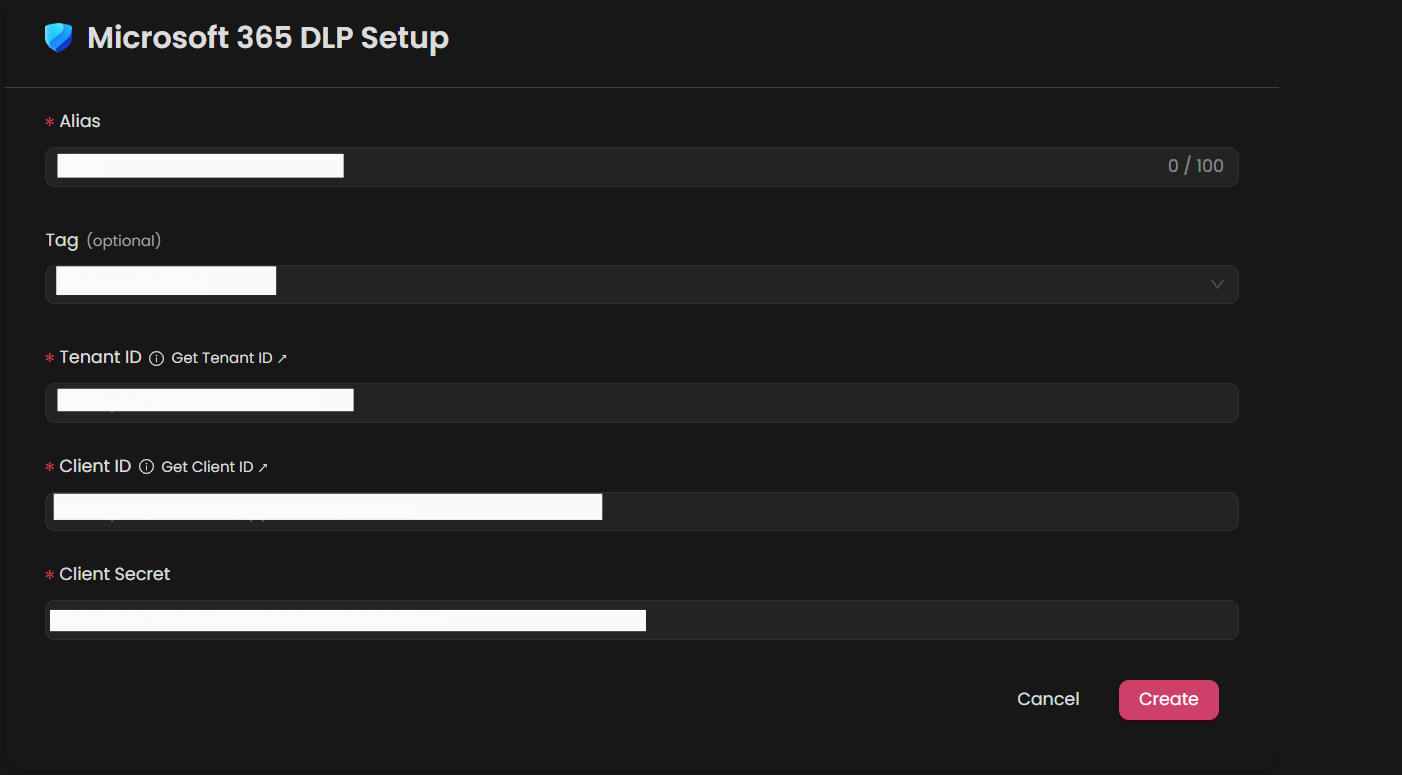
Fill in the required fields as follows:
Note: Fields marked with an asterisk (*) are mandatory.
- Alias: Provide a meaningful name or alias for this integration.
- Tag (Optional): Choose a tag to help organize the integration.
- Tenant ID: Enter your Microsoft Entra ID (Azure AD) Tenant ID.
- Client ID: Enter the Application (Client) ID from your App Registration.
- Client Secret: Enter the Client Secret value generated from your App Registration.
Verify the information, then click Create to complete the integration.
Step 4:
After the integration is successfully created, locate it under Integrations. Click on the three dots on the left side and select Test to ensure your integration is properly configured with autobotAI.

Additional Information
Required API Permissions
Your Entra ID App Registration must have the following Application permissions (not Delegated) granted and admin-consented:
| Permission | Type | Description |
|---|---|---|
InformationProtectionPolicy.Read.All | Application | Read DLP policies |
SecurityEvents.Read.All | Application | Read security events and DLP alerts |
SecurityEvents.ReadWrite.All | Application | Read and manage security events |
Reports.Read.All | Application | Read usage and activity reports |
How to Create an App Registration and Retrieve Credentials
-
Log in to Microsoft Azure Portal:
- Go to https://portal.azure.com and sign in with Global Administrator credentials.
-
Create a new App Registration:
-
Navigate to Microsoft Entra ID → App registrations.
-
Click New registration.
-
Enter a name (e.g.,
autobotAI-M365-DLP), select Accounts in this organizational directory only, and click Register. -
After creation, note the Directory (Tenant) ID and Application (Client) ID from the app's Overview page.
-
-
Grant API Permissions:
- Navigate to API permissions → Add a permission → Microsoft Graph.
- Select Application permissions and add the permissions listed in the table above.
- Click Grant admin consent to apply the permissions.
-
Create a Client Secret:
- Navigate to Certificates & secrets → New client secret.
- Enter a description, select an expiration period, and click Add.
- Copy the secret value immediately: it will not be shown again.
-
Enter Credentials in autobotAI:
- Paste the Tenant ID, Client ID, and Client Secret into the corresponding fields on the autobotAI integration form to complete the setup.
Once the integration is configured, test it to confirm autobotAI can successfully communicate with your Microsoft 365 DLP environment.