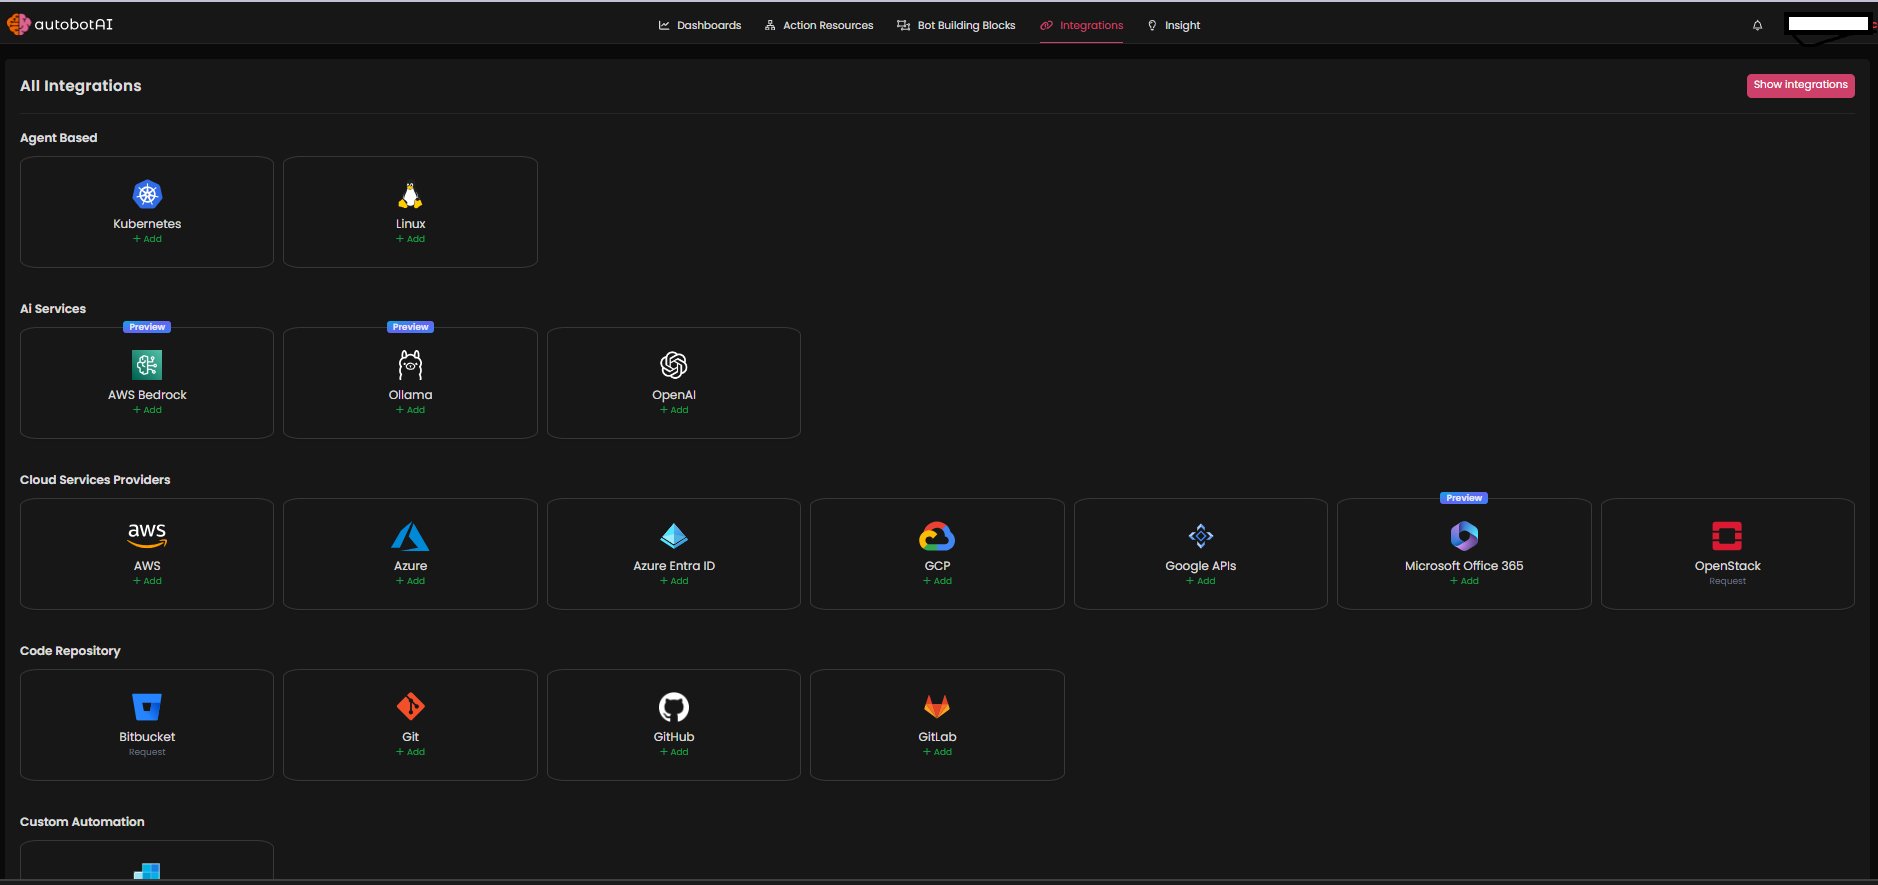
Integration
An Integration refers to a pre-built connection between the platform and a specific third-party service or tool. Integrations enable the platform to interact with other tools and services, such as -
- Cloud providers (AWS, Azure, GCP),
- Communication tools (Microsoft Teams, Slack, SMS),
- Security tools (Trend Micro Cloud One, Conformity) and more.
Each integration offers a set of functionalities and methods that you can use to interact with the external tool or service.
For example, the AWS integration provides a set of methods for managing AWS resources, such as creating, updating, and deleting EC2 instances or S3 buckets. Similarly, the Microsoft Teams integration provides methods for sending messages to a Teams channel.
Users can also create custom integrations by using webhooks.
Connecting an Integration
To connect an integration,
AWS
Step 1: Go to the Integrations page by clicking on the integrations
in the left side panel.<br>
Step 2: Select the integration you want to connect, Click on AWS in this case.
Step 3: Enter the information in the fields -
- Account Name/Alias: Enter a meaningful alias for the integration.
- Groups: Work like labels in Gmail, you can organize multiple integrations into different groups.
- Default Discovery Bots: These out-of-the-box bots will help you see stats of your AWS account. For example, you can see how many S3 buckets you have in your account.
Step 4: Click Next
.
Step 5: Select Execution Method -- Automated is pre-selected.
Step 6: Click Next
.
Step 7: Before Clicking on Launch Stack
,
Ensure you have a logged-in session of the AWS account in the same browser.
If you do not have a logged-in session of AWS account in the same browser then copy the link and open it where there is a logged-in session of AWS account in the same browser.
If everything is ready then -
Click on Launch Stack
.
You'll be redirected to the AWS account to deploy a AWS CloudFormation Stack
Done!
Azure
This guide provides instructions for setting up an integration with Azure in your AutobotAI account. By completing this process, you will connect your Azure account and its associated resources to the platform.
What is the Azure Integration For?
The Azure integration allows AutobotAI to interact with your Azure cloud resources. This enables automation and monitoring of tasks like provisioning virtual machines, managing resources, monitoring infrastructure, and ensuring compliance with security policies. You can leverage Azure's cloud computing services in workflows, automate routine tasks, and streamline cloud infrastructure management directly within AutobotAI.
Step 1:
Navigate to the Integrations page by clicking on the Integrations menu. Once there, click the + Add Integration button located at the top right corner. A list of all available integrations will appear.
Step 2:
From the list, under Cloud Service Providers, select Azure + Add to create the Azure integration.
Step 3:
Fill in the required information in the fields provided:
Note: Fields marked with an asterisk (*) are mandatory.
- Alias: Provide a meaningful name or alias for this integration.
- Groups: Use groups to organize multiple integrations, similar to how labels work in Gmail.
- Tenant ID: Enter the Tenant ID of your Azure account.
- Client ID: Enter the Client ID of your Azure account.
- Subscription ID: Enter the Subscription ID of your Azure account.
- Client Secret: Enter the Client Secret of your Azure account.
Ensure that all the information entered is correct, then click Create to complete the integration.
Once the integration is successfully created, go to your newly created Azure integration under Integrations. Click on the three dots on the left side, and select Test to ensure your integration is properly configured with AutobotAI.
Additional Information
How to Retrieve Tenant ID, Client ID, Subscription ID, and Client Secret in the Azure Portal
To integrate your Azure account, you need to gather the following information from the Azure Portal:
-
Log in to the Azure Portal:
- Go to Azure Portal and sign in with your Azure credentials.
-
Create an Azure AD App Registration (if you don’t have one):
- In the left-hand sidebar, click on Azure Active Directory.
- Navigate to App registrations and click on + New registration.
- Fill in the required fields, such as the name, and set the supported account type.
- Click Register.
-
Retrieve the Tenant ID:
- In Azure Active Directory, click on Overview.
- Under the Tenant Information section, copy the Directory (Tenant) ID. This is your Tenant ID.
-
Retrieve the Client ID:
- After registering your app, navigate to App registrations.
- Click on your app from the list.
- On the Overview page of the app, copy the Application (Client) ID. This is your Client ID.
-
Retrieve the Subscription ID:
- In the left-hand sidebar, click on Subscriptions.
- Choose your subscription from the list.
- Copy the Subscription ID from the Overview page. This is your Subscription ID.
-
Create and Retrieve the Client Secret:
- In your app's App registrations page, navigate to Certificates & secrets.
- Under the Client secrets section, click on + New client secret.
- Add a description and set an expiration period for the secret.
- Click Add. Once created, copy the Value immediately. This is your Client Secret (Note: you won’t be able to retrieve it again after leaving the page).
Once you have gathered all the information (Tenant ID, Client ID, Subscription ID, and Client Secret), you can proceed with the integration by entering them into the corresponding fields in the AutobotAI platform.
Azure Entra ID
This guide provides instructions for setting up an integration with Azure Entra ID in your AutobotAI account. By completing this process, you will connect your Azure Entra ID account and its associated resources to the platform.
What is the Azure Entra ID Integration For?
The Azure Entra ID integration allows AutobotAI to manage identities and access in your Azure environment. This integration enables automation of user provisioning and deprovisioning, group management, and access control policies directly within the AutobotAI platform. You can streamline identity management tasks, enhance security, and ensure compliance with organizational policies.
Step 1:
Navigate to the Integrations page by clicking on the Integrations menu. Once there, click the + Add Integration button located at the top right corner. A list of all available integrations will appear.
Step 2:
From the list, under Cloud Service Providers, select Azure Entra ID + Add to create the Azure Entra ID integration.
Step 3:
Fill in the required information in the fields provided:
Note: Fields marked with an asterisk (*) are mandatory.
- Account Name/Alias: Provide a meaningful name or alias for this integration.
- Groups: Use groups to organize multiple integrations, similar to how labels work in Gmail.
- Tenant ID: Enter the [Tenant ID] of your Azure Entra ID account.
- Client ID: Enter the [Client ID] of your Azure Entra ID account.
- Client Secret: Enter the [Client Secret] of your Azure Entra ID account.
Ensure that all the information entered is correct, then click Create to complete the integration.
Once the integration is successfully created, go to your newly created Azure Entra ID integration under Integrations. Click on the three dots on the left side, and select Test to ensure your integration is properly configured with AutobotAI.
Additional Information
How to Retrieve Tenant ID, Client ID, and Client Secret in the Azure Portal
To integrate your Azure Entra ID account, you need to gather the following information from the Azure Portal:
-
Log in to the Azure Portal:
Go to Azure Portal and sign in with your Azure credentials. -
Create an Azure AD App Registration (if you don’t have one):
- In the left-hand sidebar, click on Azure Active Directory.
- Navigate to App registrations and click on + New registration.
- Fill in the required fields, such as name, and set the supported account type.
- Click Register.
-
Retrieve the Tenant ID:
- In Azure Active Directory, click on Overview.
- Under the Tenant Information section, copy the Directory (Tenant) ID. This is your Tenant ID.
-
Retrieve the Client ID:
- After registering your app, navigate to App registrations.
- Click on your app from the list.
- On the Overview page of the app, copy the Application (Client) ID. This is your Client ID.
-
Create and Retrieve the Client Secret:
- In your app's App registrations page, navigate to Certificates & secrets.
- Under the Client secrets section, click on + New client secret.
- Add a description and set an expiration period for the secret.
- Click Add. Once created, copy the Value immediately. This is your Client Secret (Note: you won’t be able to retrieve it again after leaving the page).
Once you have gathered all the information (Tenant ID, Client ID, and Client Secret), you can proceed with the integration by entering them into the corresponding fields in the AutobotAI platform.
GCP
This guide provides instructions for setting up an integration with GCP in your AutobotAI account. By completing this process, you will connect your GCP account and its associated resources to the platform, enabling monitoring and management of your cloud infrastructure.
What is the GCP Integration For?
The GCP integration allows AutobotAI to access your Google Cloud resources, enabling you to automate tasks, manage your cloud infrastructure, monitor services, and integrate with other automation workflows.
Step 1:
Navigate to the Integrations page by clicking on the Integrations menu. Once there, click the + Add Integration button located at the top right corner. A list of all available integrations will appear.
Step 2:
From the list, under the Cloud Service Providers section, select GCP + Add to create the GCP integration.
Step 3:
Fill in the required information in the fields provided:
Note: Fields marked with an asterisk (*) are mandatory.
- Alias: Provide a meaningful name or alias for this integration.
- Groups: Use groups to organize multiple integrations, similar to how labels work in Gmail.
- Credentials JSON: Upload the JSON file containing your GCP service account key, which allows AutobotAI to authenticate with GCP.
Ensure that all the information entered is correct, then click Create to complete the integration.
Once the integration is successfully created, test the connection by going to your GCP integration in Integrations. Click on the three dots on the left side, and select Test to ensure your integration is properly configured with AutobotAI.
Additional Information
How to Retrieve GCP Service Account Key JSON
- Log in to Google Cloud Console: Go to Google Cloud Console and sign in.
- Navigate to IAM & Admin: From the main menu, select IAM & Admin > Service Accounts.
- Create or Select a Service Account: If necessary, create a new service account with the required permissions.
- Generate Key: Under the service account, select Keys > Add Key > Create New Key, choosing JSON as the file format.
- Download the Key: Save the JSON file to your device and upload it to the Credentials JSON field in AutobotAI.
Once the integration is successfully created, test the connection by going to your GCP integration in Integrations. Click on the three dots on the left side, and select Test to ensure your integration is properly configured with AutobotAI.
Google APIs
This guide provides instructions for setting up an integration with Google APIs in your AutobotAI account. By completing this process, you can connect various Google API services and their associated resources to the platform.
What is the Google APIs Integration For?
The Google APIs integration allows AutobotAI to interact with Google services (such as Drive, Sheets, or Gmail) to automate workflows, retrieve data, and synchronize with your Google resources.
Steps to Set Up Google APIs Integration
Step 1:
Navigate to the Integrations page by clicking on the Integrations menu. Once there, click the + Add Integration button located at the top right corner. A list of all available integrations will appear.
Step 2:
From the list, under the Cloud Service Providers section, select Google APIs + Add to create the Google APIs integration.
Step 3:
Fill in the required information in the fields provided:
Note: Fields marked with an asterisk (*) are mandatory.
- Alias: Provide a meaningful name or alias for this integration.
- Groups: Use groups to organize multiple integrations, similar to how labels work in Gmail.
- Scopes: Specify the permissions or scopes required by your integration (e.g.,
https://www.googleapis.com/auth/drive
for Google Drive). - User Email: If you need to access Google Workspace services (e.g., Gmail, Drive), provide the email address of the user you want to impersonate. This email should be part of the Google Workspace domain.
- Service Account Email: For general Google Cloud services, use the service account email. Ensure that the service account has the necessary permissions and roles assigned.
- Credentials JSON: Upload the JSON file containing your service account credentials.
After ensuring all fields are correct, click Create to complete the integration.
Additional Information
How to Retrieve Google API Credentials JSON
To create and download a new Credentials JSON file, follow these steps:
- Log in to Google Cloud Console: Go to Google Cloud Console and sign in.
- Navigate to IAM & Admin: From the main menu, go to IAM & Admin > Service Accounts.
- Create or Select a Service Account: If a service account exists with the needed permissions, select it. Otherwise, create a new one with the required roles for the Google APIs you want to access.
- Generate a New Key: Under the Keys tab, click Add Key > Create New Key, and select JSON. Download the file, as it will only be available at this time.
Important: Store the JSON file securely, as it contains sensitive credentials.
With the credentials JSON, user email (for Workspace services), and service account email (for Google Cloud services), you’re ready to integrate Google APIs with AutobotAI.
Kubernetes
This guide provides instructions for setting up an integration with Kubernetes in your AutobotAI account. By completing this process, you will connect to Kubernetes.
What is the Kubernetes Integration For?
The Kubernetes integration allows AutobotAI to interact with your Kubernetes clusters. This integration enables you to automate the management of containerized applications, monitor cluster performance, and streamline deployment processes directly within the AutobotAI platform. You can leverage Kubernetes' orchestration capabilities to enhance your DevOps workflows and improve resource management.
Step 1:
Navigate to the Integrations page by clicking on the Integrations menu. Once there, click the + Add Integration button located at the top right corner. A list of all available integrations will appear.
Step 2:
From the list, under the Agent Based section, select Kubernetes + Add to create the Kubernetes integration.
Step 3:
Fill in the required information in the fields provided:
Note: Fields marked with an asterisk (*) are mandatory.
- Alias: Provide a meaningful name or alias for this integration.
- Groups: Use groups to organize multiple integrations, similar to how labels work in Gmail.
Ensure that all the information entered is correct, then click Create to complete the integration.
Once the integration is successfully created, go to your newly created Kubernetes integration under Integrations. Click on the three dots on the left side, and select Test to ensure your integration is properly configured with AutobotAI.
Linux
This guide provides instructions for setting up an integration with Linux in your AutobotAI account. By completing this process, you will connect to Linux.
What is the Linux Integration For?
The Linux integration allows AutobotAI to manage and automate tasks on your Linux servers. This integration enables you to execute commands, manage configurations, and monitor system performance directly within the AutobotAI platform. You can streamline server management, automate routine tasks, and enhance your DevOps processes.
Step 1:
Navigate to the Integrations page by clicking on the Integrations menu. Once there, click the + Add Integration button located at the top right corner. A list of all available integrations will appear.
Step 2:
From the list, under the Agent Based section, select Linux + Add to create the Linux integration.
Step 3:
Fill in the required information in the fields provided:
Note: Fields marked with an asterisk (*) are mandatory.
- Alias: Provide a meaningful name or alias for this integration.
- Groups: Use groups to organize multiple integrations, similar to how labels work in Gmail.
Ensure that all the information entered is correct, then click Create to complete the integration.
Once the integration is successfully created, go to your newly created Linux integration under Integrations. Click on the three dots on the left side, and select Test to ensure your integration is properly configured with AutobotAI.
AWS Bedrock
This guide provides instructions for setting up an integration with AWS Bedrock in your AutobotAI account. By completing this process, you will connect your AWS Bedrock services, enabling seamless access to AI and ML capabilities within the AutobotAI platform.
What is the AWS Bedrock Integration For?
The AWS Bedrock integration allows AutobotAI to leverage machine learning models hosted on AWS Bedrock, enhancing AI-driven capabilities within your workflows.
Step 1:
Navigate to the Integrations page by clicking on the Integrations menu. Once there, click the + Add Integration button located at the top right corner. A list of all available integrations will appear.
Step 2:
From the list, under the AI Services section, select AWS Bedrock + Add to create the AWS Bedrock integration.
Step 3:
Fill in the required information in the fields provided:
Note: Fields marked with an asterisk (*) are mandatory.
- Alias: Provide a meaningful name or alias for this integration.
- Groups: Use groups to organize multiple integrations, similar to how labels work in Gmail.
- Integration ID: Enter the unique identifier for your AWS Bedrock instance that AutobotAI will connect to.
- Region: Specify the AWS region where your Bedrock service is hosted (e.g.,
us-east-1
).
Ensure that all the information entered is correct, then click Create to complete the integration.
Once the integration is successfully created, navigate to your newly created AWS Bedrock integration under Integrations. Click on the three dots on the left side, and select Test to verify that your integration is properly configured with AutobotAI.
Additional Information
How to Obtain the Integration ID
To retrieve the Integration ID for AWS Bedrock:
-
Deploy the AWS Integration CloudFormation Stack:
Ensure that you deploy the AWS Integration CloudFormation stack in the region where your AWS Bedrock service is hosted. The deployment provides the required Integration ID specific to your Bedrock instance. -
Locate Your AWS Account ID:
You’ll need your AWS account ID as part of this setup. Refer to the AWS Management Console if necessary to confirm your account ID.
Once the CloudFormation stack is successfully deployed in your selected region, you’ll be able to access the Integration ID and complete the AWS Bedrock integration.
OpenAI
This guide provides instructions for setting up an integration with OpenAI in your AutobotAI account. By completing this process, you will connect your OpenAI account and its associated resources to the platform.
What is the OpenAI Integration For?
The OpenAI integration allows AutobotAI to leverage the capabilities of OpenAI’s models for various applications, including natural language processing, content generation, and more. This integration enables automation of tasks that utilize AI models, enhancing your workflows and productivity.
Step 1:
Navigate to the Integrations page by clicking on the Integrations menu. Once there, click the + Add Integration button located at the top right corner. A list of all available integrations will appear.
Step 2:
From the list, under the AI Services section, select OpenAI + Add to create the OpenAI integration.
Step 3:
Fill in the required information in the fields provided:
Note: Fields marked with an asterisk (*) are mandatory.
- Alias: Provide a meaningful name or alias for this integration.
- Groups: Use groups to organize multiple integrations, similar to how labels work in Gmail.
- OpenAI API Key: Provide your OpenAI API key.
Ensure that all the information entered is correct, then click Create to complete the integration.
Once the integration is successfully created, go to your newly created OpenAI integration under Integrations. Click on the three dots on the left side, and select Test to ensure your integration is properly configured with AutobotAI.
Additional Information
How to Retrieve OpenAI API Key
To get your OpenAI API Key, follow these steps:
-
Log in to OpenAI:
Go to OpenAI and sign in with your OpenAI credentials. -
Access API Settings:
Once logged in, click on your profile in the top-right corner and select API Keys from the dropdown menu. -
Create New API Key:
If you don’t have an API key already, click the + Create new secret key button. OpenAI will generate a new key for you. -
Copy the API Key:
After generating the key, copy it immediately as it will only be displayed once. Use this key in the OpenAI API Key field on the AutobotAI platform to complete the integration.
Git
This guide provides instructions for setting up an integration with Git in your AutobotAI account. By completing this process, you will connect your Git account.
What is the Git Integration For?
The Git integration allows AutobotAI to connect with your Git repositories for version control and collaboration. This integration facilitates automation of development workflows, such as triggering actions on code changes, managing pull requests, and synchronizing code across multiple environments.
Step 1:
Navigate to the Integrations page by clicking on the Integrations menu. Once there, click the + Add Integration button located at the top right corner. A list of all available integrations will appear.
Step 2:
From the list, under the Code Repository section, select Git + Add to create the Git integration.
Step 3:
Fill in the required information in the fields provided:
Note: Fields marked with an asterisk (*) are mandatory.
- Alias: Provide a meaningful name or alias for this integration.
- Groups: Use groups to organize multiple integrations, similar to how labels work in Gmail.
Ensure that all the information entered is correct, then click Create to complete the integration.
Once the integration is successfully created, go to your newly created Git integration under Integrations. Click on the three dots on the left side, and select Test to ensure your integration is properly configured with AutobotAI.
GitHub
This guide provides instructions for setting up an integration with GitHub in your AutobotAI account. By completing this process, you will connect your GitHub account and its associated resources to the platform.
What is the GitHub Integration For?
The GitHub integration allows AutobotAI to interact with your GitHub repositories for version control and collaboration. This integration enables automation of workflows such as issue tracking, pull request management, and code deployment, enhancing your development processes.
Step 1:
Navigate to the Integrations page by clicking on the Integrations menu. Once there, click the + Add Integration button located at the top right corner. A list of all available integrations will appear.
Step 2:
From the list, under the Code Repository section, select GitHub + Add to create the GitHub integration.
Step 3:
Fill in the required information in the fields provided:
Note: Fields marked with an asterisk (*) are mandatory.
- Alias: Provide a meaningful name or alias for this integration.
- Groups: Use groups to organize multiple integrations, similar to how labels work in Gmail.
- GitHub Base URL: Enter your GitHub base URL. The default is
https://api.github.com/
. - GitHub Token: Provide your GitHub account token.
Ensure that all the information entered is correct, then click Create to complete the integration.
Once the integration is successfully created, go to your newly created GitHub integration under Integrations. Click on the three dots on the left side, and select Test to ensure your integration is properly configured with AutobotAI.
Additional Information
How to Retrieve GitHub Token
To generate a GitHub Token, follow these steps:
-
Log in to GitHub:
Go to GitHub and sign in with your GitHub credentials. -
Access Developer Settings:
- In the upper-right corner of any page, click your profile photo, then click Settings.
- Scroll down to Developer settings in the left-hand sidebar and click on it.
-
Generate Personal Access Token:
- Under Personal access tokens, click on Tokens (classic), then click Generate new token.
- Select the desired scopes (permissions) for your token. For example, repo to grant access to repositories.
- Once done, click
Generate token
.
-
Copy the Token:
After generating, copy the token immediately. You will not be able to view it again after navigating away from the page.
Once you have the token, you can paste it into the GitHub Token
field on the AutobotAI platform to complete the integration.
GitLab
This guide provides instructions for setting up an integration with GitLab in your AutobotAI account. By completing this process, you will connect your GitLab account and its associated resources to the platform.
What is the GitLab Integration For?
The GitLab integration allows AutobotAI to interact with your GitLab repositories for version control and collaboration. This integration enables automation of workflows such as CI/CD processes, issue tracking, and merge request management, enhancing your development lifecycle.
Step 1:
Navigate to the Integrations page by clicking on the Integrations menu. Once there, click the + Add Integration button located at the top right corner. A list of all available integrations will appear.
Step 2:
From the list, under the Code Repository section, select GitLab + Add to create the GitLab integration.
Step 3:
Fill in the required information in the fields provided:
Note: Fields marked with an asterisk (*) are mandatory.
- Alias: Provide a meaningful name or alias for this integration.
- Groups: Use groups to organize multiple integrations, similar to how labels work in Gmail.
- GitLab Base URL: Enter your GitLab base URL.
- GitLab Token: Provide your GitLab account token.
Ensure that all the information entered is correct, then click Create to complete the integration.
Once the integration is successfully created, go to your newly created GitLab integration under Integrations. Click on the three dots on the left side, and select Test to ensure your integration is properly configured with AutobotAI.
Additional Information
How to Retrieve GitLab Token
To get your GitLab Token, follow these steps:
-
Log in to GitLab:
Go to GitLab and sign in with your GitLab credentials. -
Access Personal Access Tokens:
Click on your profile in the top-right corner and go to Settings. Under Access Tokens, you can generate a new token. -
Create New Token:
Fill in a name for your token, select the required scopes (such asapi
), and click Create personal access token. -
Copy the Token:
After generating the token, copy it immediately as it will only be displayed once.
Once you have the token, you can paste it into the GitLab Token
field on the AutobotAI platform to complete the integration.
Coralogix
This guide provides instructions for setting up an integration with Coralogix in your AutobotAI account. By completing this process, you will connect your Coralogix account and its associated resources to the platform.
What is the Coralogix Integration For?
The Coralogix integration allows AutobotAI to collect, analyze, and visualize logs from your applications and services in real-time. This integration enhances your ability to monitor system performance, troubleshoot issues, and maintain operational insights, contributing to better observability and faster response times.
Step 1:
Navigate to the Integrations page by clicking on the Integrations menu. Once there, click the + Add Integration button located at the top right corner. A list of all available integrations will appear.
Step 2:
From the list, under the Monitoring Tools section, select Coralogix + Add to create the Coralogix integration.
Step 3:
Fill in the required information in the fields provided:
Note: Fields marked with an asterisk (*) are mandatory.
- Alias: Provide a meaningful name or alias for this integration.
- Groups: Use groups to organize multiple integrations, similar to how labels work in Gmail.
- API URL: Enter your Coralogix base URL. The default is
https://api.coralogix.com/
. - API Key: Provide your Coralogix API key.
Ensure that all the information entered is correct, then click Create to complete the integration.
Once the integration is successfully created, go to your newly created Coralogix integration under Integrations. Click on the three dots on the left side, and select Test to ensure your integration is properly configured with AutobotAI.
Additional Information
How to Retrieve Coralogix API Key
To get your Coralogix API Key, follow these steps:
-
Log in to Coralogix:
Go to Coralogix and sign in with your account credentials. -
Access API Keys:
From the dashboard, navigate to Settings > API Keys. -
Create New API Key:
Click on +PERSONAL Key, name it, and specify its permissions if required. -
Copy the Key:
Once generated, copy the API key. Use this key in the API Key field on the AutobotAI platform to complete the integration.
Datadog
This guide provides instructions for setting up an integration with Datadog in your AutobotAI account. By completing this process, you will connect your Datadog account and monitor application performance, system metrics, and logs through AutobotAI.
What is the Datadog Integration For?
The Datadog integration allows AutobotAI to retrieve and monitor metrics, logs, and other real-time data from Datadog, helping you manage your systems effectively and gain insights into performance. With this integration, you can automate alerts, manage incidents, and enhance visibility into application and infrastructure health.
Step 1:
Navigate to the Integrations page by clicking on the Integrations menu. Once there, click the + Add Integration button located at the top right corner. A list of all available integrations will appear.
Step 2:
From the list, under the Monitoring Tools section, select Datadog + Add to create the Datadog integration.
Step 3:
Fill in the required information in the fields provided:
Note: Fields marked with an asterisk (*) are mandatory.
- Alias: Provide a meaningful name or alias for this integration.
- Groups: Use groups to organize multiple integrations, similar to how labels work in Gmail.
- Datadog API Key: Enter the API key associated with your Datadog account, which allows AutobotAI to access data.
- Datadog Application Key: Provide the application key to authenticate with Datadog’s API. You can generate this in your Datadog account’s API settings.
- API URL: Enter the API URL for your Datadog region (for example,
https://api.datadoghq.com
for the US orhttps://api.datadoghq.eu
for the EU).
Ensure that all the information entered is correct, then click Create to complete the integration.
Once the integration is successfully created, go to your newly created Datadog integration under Integrations. Click on the three dots on the left side, and select Test to ensure your integration is properly configured with AutobotAI.
Additional Information
How to Retrieve Datadog API Key, Application Key, and API URL
To connect Datadog to AutobotAI, gather the following information:
1. Retrieve API Key
- Log in to Datadog at Datadog.
- Go to Integrations > APIs > API Keys.
- Click New Key, name it, and Create API key.
- Copy the API key and paste it in the Datadog API Key field in AutobotAI.
2. Retrieve Application Key
- In the same APIs section, go to Application Keys.
- Click New Key, name it, and Create Application Key.
- Copy the Application Key and paste it in the Datadog Application Key field.
3. API URL
Select the URL based on your Datadog region:
- US:
https://api.datadoghq.com
- EU:
https://api.datadoghq.eu
Use this URL in the API URL field in AutobotAI.
Once you have entered these details, click Create to complete the integration setup.
This guide provides instructions for setting up an integration with Email in your AutobotAI account. By completing this process, you will connect your Email account.
What is the Email Integration For?
The Email integration allows AutobotAI to send and receive emails directly from your email account. This integration enables automated email notifications, alerts, and communication, streamlining your workflows and enhancing your ability to interact with users or stakeholders through email.
Step 1:
Navigate to the Integrations page by clicking on the Integrations menu. Once there, click the + Add Integration button located at the top right corner. A list of all available integrations will appear.
Step 2:
From the list, under the Monitoring Tools section, select Email + Add to create the Email integration.
Step 3:
Fill in the required information in the fields provided:
Note: Fields marked with an asterisk (*) are mandatory.
- Alias: Provide a meaningful name or alias for this integration.
- Groups: Use groups to organize multiple integrations, similar to how labels work in Gmail.
- IMAP Host: Enter your IMAP Host. For example, for Gmail use
imap.gmail.com
. - IMAP Port: Provide the IMAP port. For example, Gmail uses port
993
. - Username: Enter your email account username.
- Password: Enter the password for your email account.
- SMTP Host: Enter your SMTP host. For example, for Gmail use
smtp.gmail.com
.
Ensure that all the information entered is correct, then click Create to complete the integration.
Once the integration is successfully created, go to your newly created Email integration under Integrations. Click on the three dots on the left side, and select Test to ensure your integration is properly configured with AutobotAI.
Additional Information
IMAP and SMTP Setup:
- IMAP (Internet Message Access Protocol) allows the integration to access emails from your inbox.
- SMTP (Simple Mail Transfer Protocol) is used to send emails. Ensure that your email provider supports these protocols.
Example Configuration for Gmail:
- IMAP Host:
imap.gmail.com
- IMAP Port:
993
- SMTP Host:
smtp.gmail.com
If using Gmail, you may need to enable Less Secure Apps in your Google Account settings or generate an App Password if 2-Step Verification is enabled.
Grafana
This guide provides instructions for setting up an integration with Grafana in your AutobotAI account. By completing this process, you will connect your Grafana account and its associated resources to the platform.
What is the Grafana Integration For?
The Grafana integration allows AutobotAI to access and visualize your monitoring data from Grafana dashboards. This integration enhances your ability to track performance metrics, generate alerts, and analyze data trends, providing valuable insights into your applications and infrastructure.
Step 1:
Navigate to the Integrations page by clicking on the Integrations menu. Once there, click the + Add Integration button located at the top right corner. A list of all available integrations will appear.
Step 2:
From the list, under the Monitoring Tools section, select Grafana + Add to create the Grafana integration.
Step 3:
Fill in the required information in the fields provided:
Note: Fields marked with an asterisk (*) are mandatory.
- Alias: Provide a meaningful name or alias for this integration.
- Groups: Use groups to organize multiple integrations, similar to how labels work in Gmail.
- Host URL: Enter your Grafana host URL. For example,
https://your-grafana-instance.com
. - Auth Key: Provide the authentication key for your Grafana account.
Ensure that all the information entered is correct, then click Create to complete the integration.
Once the integration is successfully created, go to your newly created Grafana integration under Integrations. Click on the three dots on the left side, and select Test to ensure your integration is properly configured with AutobotAI.
Additional Information
Grafana API Token Setup:
To generate an Auth Key in Grafana:
- Log into your Grafana account.
- Navigate to the Configuration section and select API Keys.
- Click on Add API Key, provide a name for the key, choose a role (Admin, Editor, Viewer), and then generate the key.
- Use the generated key in the Auth Key field during the integration setup.
Ensure the correct permissions are granted to the API key based on your needs within the platform.
New Relic
This guide provides instructions for setting up an integration with New Relic in your AutobotAI account. By completing this process, you will connect your New Relic account and its associated resources to the platform.
What is the New Relic Integration For?
The New Relic integration allows AutobotAI to gather performance and monitoring data from your New Relic account. This integration helps you track application performance, detect anomalies, and gain insights into your software's health, enabling you to make informed decisions based on real-time data.
Step 1:
Navigate to the Integrations page by clicking on the Integrations menu. Once there, click the + Add Integration button located at the top right corner. A list of all available integrations will appear.
Step 2:
From the list, under the Monitoring Tools section, select New Relic + Add to create the New Relic integration.
Step 3:
Fill in the required information in the fields provided:
Note: Fields marked with an asterisk (*) are mandatory.
- Alias: Provide a meaningful name or alias for this integration.
- Groups: Use groups to organize multiple integrations, similar to how labels work in Gmail.
- API Key: Provide your New Relic API key. You can generate an API key by logging into your New Relic account and navigating to the API key section under account settings.
- Region: Specify your New Relic region (e.g.,
US
,EU
) based on your account's location.
Ensure that all the information entered is correct, then click Create to complete the integration.
Once the integration is successfully created, go to your newly created New Relic integration under Integrations. Click on the three dots on the left side, and select Test to ensure your integration is properly configured with AutobotAI.
Additional Information
How to Generate a New Relic API Key:
- Log into your New Relic account.
- Navigate to Account Settings > API Keys.
- Click on Create a Key, provide a name for the key, and then create it.
- Use this key in the API Key field during the integration setup.
Make sure to choose the appropriate permissions when generating the API key for your integration needs.
Prometheus
This guide provides instructions for setting up an integration with Prometheus in your AutobotAI account. By completing this process, you will connect your Prometheus account and its associated resources to the platform.
What is the Prometheus Integration For?
The Prometheus integration allows AutobotAI to gather and analyze metrics data from your Prometheus server. This integration helps you monitor application performance, track system health, and visualize time-series data, facilitating proactive maintenance and optimization of your infrastructure.
Step 1:
Navigate to the Integrations page by clicking on the Integrations menu. Once there, click the + Add Integration button located at the top right corner. A list of all available integrations will appear.
Step 2:
From the list, under the Monitoring Tools section, select Prometheus + Add to create the Prometheus integration.
Step 3:
Fill in the required information in the fields provided:
Note: Fields marked with an asterisk (*) are mandatory.
- Alias: Provide a meaningful name or alias for this integration.
- Groups: Use groups to organize multiple integrations, similar to how labels work in Gmail.
- Prometheus Host URL: Enter the host URL for your Prometheus instance.
Ensure that all the information entered is correct, then click Create to complete the integration.
Once the integration is successfully created, go to your newly created Prometheus integration under Integrations. Click on the three dots on the left side, and select Test to ensure your integration is properly configured with AutobotAI.
Additional Information
How to Access Prometheus:
- Open your web browser and enter the Prometheus URL.
- Ensure that the Prometheus server is running and accessible from your network.
- If authentication is required, ensure you have the correct credentials to access the metrics.
Make sure to test the integration after setup to verify connectivity and data retrieval from your Prometheus instance.
UptimeRobot
This guide provides instructions for setting up an integration with UptimeRobot in your AutobotAI account. By completing this process, you will connect your UptimeRobot account and its associated resources to the platform.
What is the UptimeRobot Integration For?
The UptimeRobot integration allows AutobotAI to monitor the uptime and performance of your websites and services. This integration helps you receive alerts and notifications when your services go down, ensuring that you can take immediate action to maintain system availability and reliability.
Step 1:
Navigate to the Integrations page by clicking on the Integrations menu. Once there, click the + Add Integration button located at the top right corner. A list of all available integrations will appear.
Step 2:
From the list, under the Monitoring Tools section, select UptimeRobot + Add to create the UptimeRobot integration.
Step 3:
Fill in the required information in the fields provided:
Note: Fields marked with an asterisk (*) are mandatory.
- Alias: Provide a meaningful name or alias for this integration.
- Groups: Use groups to organize multiple integrations, similar to how labels work in Gmail.
- API Key: Enter your UptimeRobot API key. You can find this in your UptimeRobot account settings under the API section.
Ensure that all the information entered is correct, then click Create to complete the integration.
Once the integration is successfully created, go to your newly created UptimeRobot integration under Integrations. Click on the three dots on the left side, and select Test to ensure your integration is properly configured with AutobotAI.
Additional Information
How to Retrieve Your UptimeRobot API Key:
- Log in to your UptimeRobot account.
- Go to your account settings by clicking on your profile icon.
- Navigate to the API section.
- Copy the API key provided and paste it into the integration setup in AutobotAI.
Make sure to test the integration after setup to verify connectivity and functionality with your UptimeRobot account.
AWS SES
This guide provides instructions for setting up an integration with AWS SES (Simple Email Service) in your AutobotAI account. By completing this process, you will connect AWS SES, enabling AutobotAI to manage automated email notifications, alerts, and communication through your AWS account.
What is the AWS SES Integration For?
The AWS SES integration allows AutobotAI to send and receive emails directly through your AWS account, supporting automated email workflows, notifications, and streamlined communication with users and stakeholders.
Step 1:
Navigate to the Integrations page by clicking on the Integrations menu. Once there, click the + Add Integration button located at the top right corner. A list of all available integrations will appear.
Step 2:
From the list, under the Email Services section, select AWS SES + Add to create the AWS SES integration.
Step 3:
Fill in the required information in the fields provided:
Note: Fields marked with an asterisk (*) are mandatory.
- Alias: Provide a meaningful name or alias for this integration.
- Groups: Use groups to organize multiple integrations, similar to how labels work in Gmail.
- Integration ID: Enter the unique identifier for your AWS SES instance that AutobotAI will connect to.
- Region: Specify the AWS region where your SES service is hosted (e.g.,
us-east-1
).
Ensure that all the information entered is correct, then click Create to complete the integration.
Once the integration is successfully created, navigate to your newly created AWS SES integration under Integrations. Click on the three dots on the left side, and select Test to verify that your integration is properly configured with AutobotAI.
Additional Information
How to Obtain the Integration ID
To retrieve the Integration ID for AWS Bedrock:
-
Deploy the AWS Integration CloudFormation Stack:
Ensure that you deploy the AWS Integration CloudFormation stack in the region where your AWS Bedrock service is hosted. The deployment provides the required Integration ID specific to your Bedrock instance. -
Locate Your AWS Account ID:
You’ll need your AWS account ID as part of this setup. Refer to the AWS Management Console if necessary to confirm your account ID.
Once the CloudFormation stack is successfully deployed in your selected region, you’ll be able to access the Integration ID and complete the AWS Bedrock integration.
Google Chat
This guide provides instructions for setting up an integration with Google Chat in your AutobotAI account. By completing this process, you will connect your Google Chat and its associated resources to the platform.
What is the Google Chat Integration For?
The Google Chat integration allows AutobotAI to send notifications and updates directly to your Google Chat spaces. This integration enhances team communication by facilitating real-time updates on alerts, automation results, and other important information, ensuring that your team stays informed and responsive.
Step 1:
Navigate to the Integrations page by clicking on the Integrations menu. Once there, click the + Add Integration button located at the top right corner. A list of all available integrations will appear.
Step 2:
From the list, under the Notifications and Communications section, select Google Chat + Add to create the Google Chat integration.
Step 3:
Fill in the required information in the fields provided:
Note: Fields marked with an asterisk (*) are mandatory.
- Alias: Provide a meaningful name or alias for this integration.
- Groups: Use groups to organize multiple integrations, similar to how labels work in Gmail.
- Webhook URL: Enter the incoming webhook URL for your Google Chat space.
Ensure that all the information entered is correct, then click Create to complete the integration.
Once the integration is successfully created, go to your newly created Google Chat integration under Integrations. Click on the three dots on the left side, and select Test to ensure your integration is properly configured with AutobotAI.
Additional Information
How to Create a Google Chat Webhook:
- Open your Google Chat application.
- Go to the space where you want to receive messages from AutobotAI.
- Click on the Settings (gear) icon in the top right corner.
- Select Manage webhooks.
- Click on Add Webhook.
- Name your webhook and click Save.
- Copy the generated webhook URL and paste it into the integration setup in AutobotAI.
After completing the setup, test the integration to ensure that messages are being sent to your Google Chat space correctly.
Jira
This guide provides instructions for setting up an integration with Jira in your AutobotAI account. By completing this process, you will connect your Jira account and its associated resources to the platform.
What is the Jira Integration For?
The Jira integration allows AutobotAI to connect with your Jira projects for issue tracking, project management, and automation of workflows. This integration enables seamless updates on issues, tasks, and projects, enhancing collaboration and efficiency within your development teams.
Step 1:
Navigate to the Integrations page by clicking on the Integrations menu. Once there, click the + Add Integration button located at the top right corner. A list of all available integrations will appear.
Step 2:
From the list, under the Notifications and Communications section, select Jira + Add to create the Jira integration.
Step 3:
Fill in the required information in the fields provided:
Note: Fields marked with an asterisk (*) are mandatory.
- Alias: Provide a meaningful name or alias for this integration.
- Groups: Use groups to organize multiple integrations, similar to how labels work in Gmail.
- Jira URL: Enter your Jira instance URL (e.g.,
https://yourdomain.atlassian.net
). - Jira Username: Provide your Jira account username (or email address, depending on your setup).
- Access Token: Enter your Jira access token for authentication.
- Personal Access Token: Provide a personal access token if required for additional API access.
Ensure that all the information entered is correct, then click Create to complete the integration.
Once the integration is successfully created, go to your newly created Jira integration under Integrations. Click on the three dots on the left side, and select Test to ensure your integration is properly configured with AutobotAI.
Additional Information
How to Retrieve Your Jira Access Token:
- Log in to your Jira account.
- Go to the API tokens section in your account settings.
- Click on Create API token.
- Name your token and click Create.
- Copy the generated token and paste it into the integration setup in AutobotAI.
Make sure to test the integration after setup to verify connectivity and functionality with your Jira account.
MS Teams
This guide provides instructions for setting up an integration with MS Teams in your AutobotAI account. By completing this process, you will connect your MS Teams account and its associated resources to the platform.
What is the MS Teams Integration For?
The MS Teams integration allows AutobotAI to send notifications and updates directly to your MS Teams channels. This integration enhances team communication and collaboration by providing real-time alerts and information related to your projects and workflows.
Step 1:
Navigate to the Integrations page by clicking on the Integrations menu. Once there, click the + Add Integration button located at the top right corner. A list of all available integrations will appear.
Step 2:
From the list, under the Notifications and Communications section, select MS Teams + Add to create the MS Teams integration.
Step 3:
Fill in the required information in the fields provided:
Note: Fields marked with an asterisk (*) are mandatory.
- Alias: Provide a meaningful name or alias for this integration.
- Groups: Use groups to organize multiple integrations, similar to how labels work in Gmail.
- Webhook URL: Enter the incoming webhook URL for your MS Teams channel.
Ensure that all the information entered is correct, then click Create to complete the integration.
Once the integration is successfully created, go to your newly created MS Teams integration under Integrations. Click on the three dots on the left side, and select Test to ensure your integration is properly configured with AutobotAI.
Additional Information
How to Create an MS Teams Webhook:
- Open your Microsoft Teams application.
- Go to the channel where you want to receive messages from AutobotAI.
- Click on the More options (three dots) next to the channel name.
- Select Connectors from the dropdown menu.
- Find and select Incoming Webhook from the list of connectors.
- Click Add and then configure the webhook by naming it and optionally uploading an image.
- Copy the generated webhook URL and paste it into the integration setup in AutobotAI.
After completing the setup, test the integration to ensure that messages are being sent to your MS Teams channel correctly.
Slack Integration Guide
This guide provides instructions for setting up an integration with Slack in your AutobotAI account. By completing this process, you will connect your Slack account and its associated resources to the platform.
What is the Slack Integration For?
The Slack integration allows AutobotAI to send notifications, alerts, and updates directly to your Slack channels. This integration enhances team communication by ensuring that important information reaches your team in real time, facilitating collaboration and responsiveness.
Step 1:
Navigate to the Integrations page by clicking on the Integrations menu. Once there, click the + Add Integration button located at the top right corner. A list of all available integrations will appear.
Step 2:
From the list, under the Notifications and Communications section, select Slack + Add to create the Slack integration.
Step 3:
Fill in the required information in the fields provided:
Note: Fields marked with an asterisk (*) are mandatory.
For Webhook Integration type:
- Alias: Provide a meaningful name or alias for this integration.
- Groups: Use groups to organize multiple integrations, similar to how labels work in Gmail.
- Webhook URL: Enter the incoming webhook URL for your Slack channel.
For Bot Token Integration type:
- Alias: Provide a meaningful name or alias for this integration.
- Groups: Use groups to organize multiple integrations, similar to how labels work in Gmail.
- Workspace Name: Enter the name of your Slack workspace.
- Slack Bot Token: Provide your Slack bot token.
Ensure that all the information entered is correct, then click Create to complete the integration.
Once the integration is successfully created, navigate to your newly created Slack integration under Integrations. Click on the three dots on the left side, and select Test to ensure your integration is properly configured with AutobotAI.
Additional Information
How to Create a Slack Webhook:
- Open your Slack workspace.
- Navigate to the channel where you want to send messages.
- Click on the Settings (gear icon) in the top right corner of the channel.
- Select Add an app or integration.
- Search for and select Incoming WebHooks.
- Click Add to Slack.
- Choose a channel and click Authorize.
- Copy the generated webhook URL and paste it into the integration setup in AutobotAI.
How to Create a Slack Bot Token/OAuth Token
An OAuth Token is a token provided by Slack that allows your application to interact with Slack's API. This token can be a user or bot token, depending on the use case, but a bot token is recommended for most integrations.
Minimum Required Permissions:
channels:read
groups:read
im:read
mpim:read
Additional permissions may be required depending on the specific actions you want to perform.
To obtain an OAuth token:
- Navigate to the Slack API page and select your app.
- Configure the OAuth & Permissions section to request the necessary scopes.
- Authorize the app to generate a token after user authorization.
After completing the setup, test the integration to ensure that messages are being sent to your Slack channel correctly.
AWS Athena
This guide provides instructions for setting up an integration with AWS Athena in your AutobotAI account. By completing this process, you will connect your AWS Athena services, enabling data query capabilities directly within the AutobotAI platform.
What is the AWS Athena Integration For?
The AWS Athena integration allows AutobotAI to query data stored in Amazon S3, supporting data-driven insights and automated reporting workflows within your AutobotAI setup.
Step 1:
Navigate to the Integrations page by clicking on the Integrations menu. Once there, click the + Add Integration button located at the top right corner. A list of all available integrations will appear.
Step 2:
From the list, under the Data Analytics section, select AWS Athena + Add to create the AWS Athena integration.
Step 3:
Fill in the required information in the fields provided:
Note: Fields marked with an asterisk (*) are mandatory.
- Alias: Provide a meaningful name or alias for this integration.
- Groups: Use groups to organize multiple integrations, similar to how labels work in Gmail.
- Region: Specify the AWS region where your Athena service is hosted (e.g.,
us-east-1
). - Integration ID: Enter the unique identifier for your AWS Bedrock instance that AutobotAI will connect to.
Ensure that all the information entered is correct, then click Create to complete the integration.
Once the integration is successfully created, navigate to your newly created AWS Athena integration under Integrations. Click on the three dots on the left side, and select Test to verify that your integration is properly configured with AutobotAI.
Additional Information
How to Obtain the Integration ID
To retrieve the Integration ID for AWS Bedrock:
-
Deploy the AWS Integration CloudFormation Stack:
Ensure that you deploy the AWS Integration CloudFormation stack in the region where your AWS Bedrock service is hosted. The deployment provides the required Integration ID specific to your Bedrock instance. -
Locate Your AWS Account ID:
You’ll need your AWS account ID as part of this setup. Refer to the AWS Management Console if necessary to confirm your account ID.
Once the CloudFormation stack is successfully deployed in your selected region, you’ll be able to access the Integration ID and complete the AWS Bedrock integration.
Python
This guide provides instructions for setting up an integration with Python in your AutobotAI account. By completing this process, you will connect your Python integration.
What is the Python Integration For?
The Python integration allows you to execute Python scripts and automate workflows directly within the AutobotAI platform. This integration enables developers to leverage the power of Python for tasks such as data processing, API interactions, and custom automation, enhancing the flexibility and functionality of your projects.
Step 1:
Navigate to the Integrations page by clicking on the Integrations menu. Once there, click the + Add Integration button located at the top right corner. A list of all available integrations will appear.
Step 2:
From the list, under the Others section, select Python + Add to create the Python integration.
Step 3:
Fill in the required information in the fields provided:
Note: Fields marked with an asterisk (*) are mandatory.
- Alias: Provide a meaningful name or alias for this integration.
- Groups: Use groups to organize multiple integrations, similar to how labels work in Gmail.
Ensure that all the information entered is correct, then click Create to complete the integration.
Once the integration is successfully created, go to your newly created Python integration under Integrations. Click on the three dots on the left side, and select Test to ensure your integration is properly configured with AutobotAI.
AbuseIPDB
This guide provides instructions for setting up an integration with AbuseIPDB in your AutobotAI account. By completing this process, you will connect your AbuseIPDB account and its associated resources to the platform.
What is the AbuseIPDB Integration For?
The AbuseIPDB integration allows you to leverage the AbuseIPDB service to check IP addresses against a database of reported abusive activity. This can help you enhance your security measures by identifying potentially malicious IPs and taking appropriate action.
Step 1:
Navigate to the Integrations page by clicking on the Integrations menu. Once there, click the + Add Integration button located at the top right corner. A list of all available integrations will appear.
Step 2:
From the list, under the Security Tools section, select AbuseIPDB + Add to create the AbuseIPDB integration.
Step 3:
Fill in the required information in the fields provided:
Note: Fields marked with an asterisk (*) are mandatory.
- Alias: Provide a meaningful name or alias for this integration.
- Groups: Use groups to organize multiple integrations, similar to how labels work in Gmail.
- API Key: Enter your AbuseIPDB API key. You can find this in your AbuseIPDB account settings under the API section.
Ensure that all the information entered is correct, then click Create to complete the integration.
Once the integration is successfully created, go to your newly created AbuseIPDB integration under Integrations. Click on the three dots on the left side, and select Test to ensure your integration is properly configured with AutobotAI.
Additional Information
How to Retrieve Your AbuseIPDB API Key:
- Log in to your AbuseIPDB account.
- Navigate to the API section from your AbuseIPDB User Account Summary.
- Copy the API key provided in this section.
- Paste the API key into the integration setup in AutobotAI.
Make sure to test the integration after setup to verify connectivity and functionality with your AbuseIPDB account.
Cloudflare
This guide provides instructions for setting up an integration with Cloudflare in your AutobotAI account. By completing this process, you will connect your Cloudflare account and its associated resources to the platform.
What is the Cloudflare Integration For?
The Cloudflare integration allows you to manage your Cloudflare settings and resources directly from AutobotAI. This includes functions like security management, performance optimization, and DNS management.
Step 1:
Navigate to the Integrations page by clicking on the Integrations menu. Once there, click the + Add Integration button located at the top right corner. A list of all available integrations will appear.
Step 2:
From the list, under the Security Tools section, select Cloudflare + Add to create the Cloudflare integration.
Step 3:
Fill in the required information in the fields provided:
Note: Fields marked with an asterisk (*) are mandatory.
For Token Integration (Recommended) type:
- Alias: Provide a meaningful name or alias for this integration.
- Groups: Use groups to organize multiple integrations, similar to how labels work in Gmail.
- Token API Key: Enter your Cloudflare API Token.
For Global API Key Integration:
- Alias: Provide a meaningful name or alias for this integration.
- Groups: Use groups to organize multiple integrations, similar to how labels work in Gmail.
- Email: Enter the email associated with your Cloudflare account.
- API Key: Enter your Cloudflare Global API Key.
Ensure that all the information entered is correct, then click Create to complete the integration.
Once the integration is successfully created, go to your newly created Cloudflare integration under Integrations. Click on the three dots on the left side, and select Test to ensure your integration is properly configured with AutobotAI.
Additional Information
How to Retrieve Your Cloudflare API Key:
For Token API Key:
- Log in to your Cloudflare account.
- Click on your profile icon in the top right corner and select My Profile.
- In apperance navigate to the API Tokens tab.
- Click on Create Token if you need a new token, or copy an existing token.
- Paste the token into the integration setup in AutobotAI.
For Global API Key:
- Log in to your Cloudflare account.
- Click on your profile icon in the top right corner and select My Profile.
- Scroll down to the API Keys section.
- Click on View next to the Global API Key.
- Copy the API Key and paste it into the integration setup in AutobotAI.
Make sure to test the integration after setup to verify connectivity and functionality with your Cloudflare account.
GitGuardian
This guide provides instructions for setting up an integration with GitGuardian in your AutobotAI account. By completing this process, you will connect your GitGuardian account and its associated resources to the platform.
What is the GitGuardian Integration For?
The GitGuardian integration helps you monitor your code repositories for sensitive data leaks, ensuring better security and compliance across your projects.
Step 1:
Navigate to the Integrations page by clicking on the Integrations menu. Once there, click the + Add Integration button located at the top right corner. A list of all available integrations will appear.
Step 2:
From the list, under the Security Tools section, select GitGuardian + Add to create the GitGuardian integration.
Step 3:
Fill in the required information in the fields provided:
Note: Fields marked with an asterisk (*) are mandatory.
- Alias: Provide a meaningful name or alias for this integration.
- Groups: Use groups to organize multiple integrations, similar to how labels work in Gmail.
- GitGuardian Token: Enter your GitGuardian API token.
Ensure that all the information entered is correct, then click Create to complete the integration.
Once the integration is successfully created, go to your newly created GitGuardian integration under Integrations. Click on the three dots on the left side, and select Test to ensure your integration is properly configured with AutobotAI.
Additional Information
How to Retrieve Your GitGuardian API Token:
- Log in to your GitGuardian account.
- Click on your profile icon in the top right corner and select Account Settings.
- Navigate to the API section in left icons.
- If you do not have an existing token, click on Create API Key.
- Name your API key and configure the necessary permissions, then click Create.
- Copy the generated API token and paste it into the integration setup in AutobotAI.
Make sure to test the integration after setup to verify connectivity and functionality with your GitGuardian account.
IPInfo
This guide provides instructions for setting up an integration with IPInfo in your AutobotAI account. By completing this process, you will connect your IPInfo account and its associated resources to the platform.
What is the IPInfo Integration For?
The IPInfo integration allows you to enrich your security data by providing detailed information about IP addresses, helping in identifying potential threats and enhancing your incident response capabilities.
Step 1:
Navigate to the Integrations page by clicking on the Integrations menu. Once there, click the + Add Integration button located at the top right corner. A list of all available integrations will appear.
Step 2:
From the list, under the Security Tools section, select IPInfo + Add to create the IPInfo integration.
Step 3:
Fill in the required information in the fields provided:
Note: Fields marked with an asterisk (*) are mandatory.
- Alias: Provide a meaningful name or alias for this integration.
- Groups: Use groups to organize multiple integrations, similar to how labels work in Gmail.
- API Key: Enter your IPInfo API key.
Ensure that all the information entered is correct, then click Create to complete the integration.
After the integration is created, navigate to your IPInfo integration on the Integrations page. Click the three dots next to the integration, and select Test to verify that the integration is configured correctly with AutobotAI.
Additional Information
How to Retrieve Your IPInfo API Key:
- Log in to your IPInfo account.
- Navigate to the Token section in left side.
- If you do not have an existing API token, click on Create a New Token.
- Copy the generated API token and paste it into the integration setup in AutobotAI.
Make sure to test the integration after setup to verify connectivity and functionality with your IPInfo account.
IPStack
This guide provides instructions for setting up an integration with IPStack in your AutobotAI account. By completing this process, you will connect your IPStack account and its associated resources to the platform.
What is the IPStack Integration For?
The IPStack integration allows you to retrieve information about IP addresses, helping you enhance your security measures and better understand user locations.
Step 1:
Navigate to the Integrations page by clicking on the Integrations menu. Once there, click the + Add Integration button located at the top right corner. A list of all available integrations will appear.
Step 2:
From the list, under the Security Tools section, select IPStack + Add to create the IPStack integration.
Step 3:
Fill in the required information in the fields provided:
Note: Fields marked with an asterisk (*) are mandatory.
- Alias: Provide a meaningful name or alias for this integration.
- Groups: Use groups to organize multiple integrations, similar to how labels work in Gmail.
- API Key: Enter your IPStack API key.
Ensure that all the information entered is correct, then click Create to complete the integration.
After the integration is created, navigate to your IPStack integration on the Integrations page. Click the three dots next to the integration and select Test to verify that the integration is configured correctly with AutobotAI.
Additional Information
How to Retrieve Your ipstack API Key:
- Log in to your ipstack account.
- Click on your profile icon in the top right corner and select Dashboard.
- Navigate to the APIs section in left side.
- Your API key will be displayed there. If you do not have an existing API key, you can generate a new one.
- Copy the API key and paste it into the integration setup in AutobotAI.
Make sure to test the integration after setup to verify connectivity and functionality with your ipstack account.
Shodan
This guide provides instructions for setting up an integration with Shodan in your AutobotAI account. By completing this process, you will connect your Shodan account and its associated resources to the platform.
What is the Shodan Integration For?
The Shodan integration allows you to gather and analyze data about devices connected to the internet, enhancing your ability to monitor and secure your assets.
Step 1:
Navigate to the Integrations page by clicking on the Integrations menu. Once there, click the + Add Integration button located at the top right corner. A list of all available integrations will appear.
Step 2:
From the list, under the Security Tools section, select Shodan + Add to create the Shodan integration.
Step 3:
Fill in the required information in the fields provided:
Note: Fields marked with an asterisk (*) are mandatory.
- Alias: Provide a meaningful name or alias for this integration.
- Groups: Use groups to organize multiple integrations, similar to how labels work in Gmail.
- API Key: Enter your Shodan API key.
Ensure that all the information entered is correct, then click Create to complete the integration.
After the integration is created, navigate to your Shodan integration on the Integrations page. Click the three dots next to the integration and select Test to verify that the integration is configured correctly with AutobotAI.
Additional Information
How to Retrieve Your Shodan API Key:
- Log in to your Shodan account.
- Click on your username in the top right corner and select Account from the dropdown menu.
- In the API section, your API key will be displayed in overview.
- If you do not have an API key, you can generate one by following the on-screen instructions.
- Copy the API key and paste it into the integration setup in AutobotAI.
Make sure to test the integration after setup to verify connectivity and functionality with your Shodan account.
Splunk Integration Guide
This guide provides instructions for setting up an integration with Splunk in your AutobotAI account. By completing this process, you will connect your Splunk account and its associated resources to the platform.
What is the Splunk Integration For?
The Splunk integration allows AutobotAI to access and manage data logs and metrics from your Splunk instance. This enables automated alerts, monitoring, and data analysis, helping you gain insights into system performance and security.
Steps to Set Up Splunk Integration
Step 1:
Navigate to the Integrations page by clicking on the Integrations menu. Once there, click the + Add Integration button located at the top right corner. A list of all available integrations will appear.
Step 2:
From the list, under the Security Tools section, select Splunk + Add to create the Splunk integration.
Step 3:
Fill in the required information in the fields provided:
Note: Fields marked with an asterisk (*) are mandatory.
- Alias: Provide a meaningful name or alias for this integration.
- Groups: Use groups to organize multiple integrations, similar to how labels work in Gmail.
- TCP Management HOST URL: Enter the URL for the Splunk TCP Management host. This is typically the IP or hostname where your Splunk instance receives data inputs.
- Username: The username for authenticating with your Splunk instance.
- Password: The password for the above username to allow secure access to Splunk.
Ensure that all the information entered is correct, then click Create to complete the integration.
After the integration is created, navigate to your Splunk integration on the Integrations page. Click the three dots next to the integration and select Test to verify that the integration is configured correctly with AutobotAI.
Additional Information
How to Retrieve Splunk Credentials
To connect AutobotAI with your Splunk instance, you will need the TCP Management Host URL, username, and password. Here’s how to retrieve them:
- Log in to Splunk: Access your Splunk instance at your Splunk web URL (e.g.,
http://your-splunk-server:8000
) with admin credentials. - Locate TCP Management Port: In your Splunk instance, go to Settings > Data Inputs > TCP. Find or configure the port that listens for data inputs.
- Create or Verify User Account: In Settings > Access Controls > Users, create a new user with the necessary roles, or verify an existing user with access to the required data.
- Copy the TCP Management Host URL: This is typically in the format
http://<splunk_host>:<tcp_port>
.
With the TCP Management Host URL, username, and password, you’re ready to integrate Splunk with AutobotAI.
Trivy
This guide provides instructions for setting up an integration with Trivy in your AutobotAI account. By completing this process, you will connect your Trivy account and its associated resources to the platform.
What is the Trivy Integration For?
The Trivy integration allows you to scan container images and filesystems for vulnerabilities, helping you enhance your security posture.
Step 1:
Navigate to the Integrations page by clicking on the Integrations menu. Once there, click the + Add Integration button located at the top right corner. A list of all available integrations will appear.
Step 2:
From the list, under the Security Tools section, select Trivy + Add to create the Trivy integration.
Step 3:
Fill in the required information in the fields provided:
Note: Fields marked with an asterisk (*) are mandatory.
- Alias: Provide a meaningful name or alias for this integration.
- Groups: Use groups to organize multiple integrations, similar to how labels work in Gmail.
Ensure that all the information entered is correct, then click Create to complete the integration.
After the integration is created, navigate to your Trivy integration on the Integrations page. Click the three dots next to the integration and select Test to verify that the integration is configured correctly with AutobotAI.
URLScan
This guide provides instructions for setting up an integration with URLScan in your AutobotAI account. By completing this process, you will connect your URLScan account and its associated resources to the platform.
What is the URLScan Integration For?
The URLScan integration allows you to scan URLs for potential threats and gather insights about the safety of websites.
Step 1:
Navigate to the Integrations page by clicking on the Integrations menu. Once there, click the + Add Integration button located at the top right corner. A list of all available integrations will appear.
Step 2:
From the list, under the Security Tools section, select URLScan + Add to create the URLScan integration.
Step 3:
Fill in the required information in the fields provided:
Note: Fields marked with an asterisk (*) are mandatory.
- Alias: Provide a meaningful name or alias for this integration.
- Groups: Use groups to organize multiple integrations, similar to how labels work in Gmail.
- API Key: Enter your URLScan API key.
Ensure that all the information entered is correct, then click Create to complete the integration.
After the integration is created, navigate to your URLScan integration on the Integrations page. Click the three dots next to the integration and select Test to verify that the integration is configured correctly with AutobotAI.
Additional Information
How to Retrieve Your URLScan API Key:
- Log in to your URLScan account.
- Navigate to the API section in your account Settings&API.
- Copy the API key provided. If you do not see one, you may need to generate a new key by following the on-screen instructions.
- Paste the API key into the integration setup in AutobotAI.
After setup, test the integration to verify connectivity and ensure URLScan functions correctly within AutobotAI.
VirusTotal
This guide provides instructions for setting up an integration with VirusTotal in your AutobotAI account. By completing this process, you will connect your VirusTotal account and its associated resources to the platform.
What is the VirusTotal Integration For?
The VirusTotal integration allows you to scan files and URLs for malware, check their safety status, and gather detailed reports from various antivirus engines.
Step 1:
Navigate to the Integrations page by clicking on the Integrations menu. Once there, click the + Add Integration button located at the top right corner. A list of all available integrations will appear.
Step 2:
From the list, under the Security Tools section, select VirusTotal + Add to create the VirusTotal integration.
Step 3:
Fill in the required information in the fields provided:
Note: Fields marked with an asterisk (*) are mandatory.
- Alias: Provide a meaningful name or alias for this integration.
- Groups: Use groups to organize multiple integrations, similar to how labels work in Gmail.
- API Key: Enter your VirusTotal API key.
Ensure that all the information entered is correct, then click Create to complete the integration.
After the integration is created, navigate to your VirusTotal integration on the Integrations page. Click the three dots next to the integration and select Test to verify that the integration is configured correctly with AutobotAI.
Additional Information
How to Retrieve Your VirusTotal API Key:
- Log in to your VirusTotal account.
- Go to the API Keys section in your profile settings.
- Copy the API key provided. If you do not see one, you may need to create a new key by following the instructions on the page.
- Paste the API key into the integration setup in AutobotAI.
After setup, test the integration to verify connectivity and ensure VirusTotal functions correctly within AutobotAI.
WHOIS
This guide provides instructions for setting up an integration with WHOIS in your AutobotAI account. By completing this process, you will connect your WHOIS account and its associated resources to the platform.
What is the WHOIS Integration For?
The WHOIS integration allows you to query domain registration information, helping you identify domain owners, registration dates, and more.
Step 1:
Navigate to the Integrations page by clicking on the Integrations menu. Once there, click the + Add Integration button located at the top right corner. A list of all available integrations will appear.
Step 2:
From the list, under the Security Tools section, select WHOIS + Add to create the WHOIS integration.
Step 3:
Fill in the required information in the fields provided:
Note: Fields marked with an asterisk (*) are mandatory.
- Alias: Provide a meaningful name or alias for this integration.
- Groups: Use groups to organize multiple integrations, similar to how labels work in Gmail.
Ensure that all the information entered is correct, then click Create to complete the integration.
After the integration is created, navigate to your WHOIS integration on the Integrations page. Click the three dots next to the integration and select Test to verify that the integration is configured correctly with AutobotAI.